Everything posted by Sandeep B.
-
How to Install MSSQL Express Server In CWP Centos 7/8 Stream Almalinux 7/8 Rockylinux 7/8
In this tutorial we’ll learn how to install MSSQL express server in centos/EL 7/8 stream OS easily. Microsoft SQL Server Express is a version of Microsoft’s SQL Server relational database management system that is free to download, distribute and use. It comprises a database specifically targeted for embedded and smaller-scale applications. To install MSSQL express edition follow the below steps : First install some dependencies :- yum install python2 compat-openssl10 openssl-devel Second make python 2 default alternative interpreter : alternatives --config python Third Microsoft MSSQL repo : For Centos 7/EL7 : curl -o /etc/yum.repos.d/mssql-server.repo https://packages.microsoft.com/config/rhel/7/mssql-server-2019.repo or Centos 8/EL8/AlmaLinux/RockyLinux : curl -o /etc/yum.repos.d/mssql-server.repo https://packages.microsoft.com/config/rhel/8/mssql-server-2019.repo Fourth Install MSSQL express server : yum install mssql-server Fifth Run mssql-conf via below command and choose the Express edition and accept the licensing and terms by typing “yes” : /opt/mssql/bin/mssql-conf setup ** choose “Express” by typing the number you see Infront of it, also choose/enter the password fo “SA” user Sixth enable MSSQL to run on boot : systemctl enable mssql-server you can restart, start and stop mssql-server as below : systemctl start mssql-server systemctl stop mssql-server systemctl restart mssql-server Install the SQL Server command-line tools To install sqlcmd follow this : For Centos 7/EL7 : curl -o /etc/yum.repos.d/msprod.repo https://packages.microsoft.com/config/rhel/7/prod.repo For 8/EL8/AlmaLinux/RockyLinux : curl -o /etc/yum.repos.d/msprod.repo https://packages.microsoft.com/config/rhel/8/prod.repo Then install the sqlcmd tool : yum remove unixODBC-utf16 unixODBC-utf16-devel -y && yum install mssql-tools unixODBC-devel -y Now set the environment variable : echo 'export PATH="$PATH:/opt/mssql-tools/bin"' >> ~/.bash_profile echo 'export PATH="$PATH:/opt/mssql-tools/bin"' >> ~/.bashrc Now update the current shell environment : source ~/.bashrc example : you can connect to SA user with below command : sqlcmd -S localhost -U SA -P 'YourPassword'
-
How to scan for malwares and viruses with maldet in Linux
Maldet is a malware scanner for Linux servers. It detects varieties of infections and malwares within your scripts (php and etc) and in server. To scan for viruses with Maldet, follow these steps: Log in to your Linux server as the root user. Install Maldet by running the following command: wget http://www.rfxn.com/downloads/maldetect-current.tar.gz tar -xzf maldetect-current.tar.gz cd maldetect-*/ sh install.sh Update Maldet with the latest malware definitions by running the following command: maldet -u To scan a specific directory, run the following command: maldet -a /path/to/directory Replace “/path/to/directory” with the path to the directory you want to scan. To scan all files on the server, run the following command: maldet -a / #or maldet -a /home #or maldet -a /home/user/public_html Note that this can take a long time to complete, depending on the size of your server and the number of files. Maldet will output any suspicious files it finds. If it finds a file that it suspects is malware, it will quarantine it automatically if enable. You can view the quarantine list by running the following command: maldet --quarantine list If you want to restore a file from quarantine, run the following command: maldet --quarantine restore ID Replace “ID” with the ID of the file you want to restore, which you can find in the quarantine list. That’s it! You’ve successfully scanned for viruses with Maldet. For more advance malware/virus scanning and cleaning you can contact me (paid service low price)
-
Enable public key authentication and login with SSH keys without Password with PUTTY-PuttyGEN
SSH keys provide a more secure way of logging in compared to using a password alone. While a password can eventually be cracked with a brute-force attack, SSH keys are nearly impossible to decipher by brute force alone. With public key authentication, every computer has (i) a public and (ii) a private “key” (two mathematically-linked algorithms that are effectively impossible to crack). Setup SSH Keys on your Windows computer/laptop using PuttyGEN Step 1 Download PuttyGEN from the Homepage website. Scroll down until you find puttygen.exe and download either 32 or 64bit version. Step 2 Start PuttyGEN by double clicking on its icon Step 3 From top menu, click on “Key” and select “SSH-2 RSA” and in the bottom right box change the number 2048 to 4096 Step 4 Click “Generate” button Step 5 Move your mouse pointer around in the blank area of the Key section, below the progress bar (to generate some randomness) until the progress bar is full Step 6 Click the “Save public key” button & choose whatever filename you’d like (some users create a folder in their computer named my_keys) Step 7 Click the “Save private key” button & choose whatever filename you’d like Step 8 Right-click in the text field labeled Public key for pasting into OpenSSH authorized_keys file and choose Select All, right-click again and choose Copy Step 9 Login to your VPS or Dedicated server Step 10 Run the following commands: mkdir ~/.ssh chmod 0700 ~/.ssh touch ~/.ssh/authorized_keys chmod 0644 ~/.ssh/authorized_keys Step 11 Paste the SSH public key which you copied in step 8 into your ~/.ssh/authorized_keys file Lets setup Putty on your Windows OS Step 1 Start PuTTY by double-clicking its executable file Step 2 PuTTY’s initial window is the Session Category (navigate PuTTY’s various categories, along the left-hand side of the window) Step 3 In the Host Name field, enter the IP address of your VPS or its fully qualified domain name (FQDN) Step 4 Enter the port number in the Port field (for added security, consider changing your server’s SSH port to a non-standard port. Step 5 Along the left-hand side of the window, select the Data sub-category, under Connection Step 6 Specify the username that you plan on using, when logging in to the SSH server, and whose profile you’re saving, in the Auto-login username field Step 7 Expand the SSH sub-category, under Connection Step 8 Highlight the Auth sub-category and click the Browse button, on the right-hand side of the PuTTY window Step 9 Browse your file system and select your previously-created private key Step 10 Return to the Session Category and enter a name for this profile in the Saved Sessions field, e.g. user@123.456.78.9 or user@host.yourdomain.tld Step 11 Click the Save button Now you can go ahead and log in to your server and you will not be prompted for a password. Finally let’s disable username/password login on your vps/dedicated server Step 1 Open /etc/ssh/sshd_config nano /etc/ssh/sshd_config Step 1 Lets change both “PasswordAuthentication” and “UsePAM” options to “no” [...] PasswordAuthentication no [...] UsePAM no [...] Step 2 Restart your SSH server service sshd restart
-
Best Hosting providers for CWP - Control Web Panel
Windows VPS are not cheap instead buy RDP from https://webpundits.in/ clearance sales : https://webpundits.in/clients/index.php?rp=/store/stock-clearance-sale they are best provider for RDP but the activation time is longer sometime you've to wait 24 hrs.
-
How to install latest Stable/mainline Nginx in CWP, Centos 8/9 stream, AlmaLinux 8/9, RockyLinux 8/9
In this tutorial we'll learn how we can enable and install Latest stable version of nginx in centos Stream , almalinux and rockylinux. By default This OS have old version of nginx installed from nginx stream module. To install latest version of nginx stable or mainline do the steps : Step 1 : Disable nginx module : dnf module disable nginx -y Step 2 : Add Official repository for nginx : Create repository : > /etc/yum.repos.d/nginx.repo nano /etc/yum.repos.d/nginx.repo For stable Nginx and add this line : [nginx-stable] name=nginx stable repo baseurl=http://nginx.org/packages/centos/$releasever/$basearch/ gpgcheck=1 enabled=1 gpgkey=https://nginx.org/keys/nginx_signing.key module_hotfixes=true For mainline Nginx and add this line : [nginx-mainline] name=nginx mainline repo baseurl=http://nginx.org/packages/mainline/centos/$releasever/$basearch/ gpgcheck=1 enabled=1 gpgkey=https://nginx.org/keys/nginx_signing.key module_hotfixes=true Step 3 : Remove any nginx version installed : dnf remove nginx -y Step 4 : Install the latest version of nginx : dnf install nginx -y systemctl enable nginx systemctl restart nginx That's it you can now check the nginx version via this command : nginx -V
-
Enable and install WDDX extension in PHP 7.4
In this tutorial we’ll install WDDX php extension in php 7.4. This extension is DEPRECATED and REMOVED as of PHP 7.4. Lets find what is WDDX ? – WDDX (Web Distributed Data eXchange) is a programming language-, platform- and transport-neutral data interchange mechanism designed to pass data between different environments and different computers. No worry we can still install WDDX extension in php 7.4 follow this easy guide to this :Step 1 : Building and installing WDDX php extension : Step 1 : wget https://github.com/php/pecl-text-wddx/archive/master.zip -O wddx.zip unzip wddx.zip cd pecl-text-wddx-master phpize ./configure make make install Step 2 : Enabling WDDX php extension In php.ini add this following line to enable WDDX : extension=wddx.so Restart apache/php-fpm/php-handler service done. Step 3 : Check wddx is installed correctly and loaded via this command : php -m | grep wddx If loaded successfully then result will look like : [root@mysterydata]# php -m | grep wddx wddx Or check via php info page
-
Install and Upgrade to Kernel 6.5 in CentOS 7/Centos 8 Stream, CWP7, aaPanel
In this tutorial we’ll updating/installing Kernel 6.1 on Linux OS – Centos 7/8 EL7/8. So what is kernel? -A kernel is the lowest level of easily replaceable software that interfaces with the hardware in your computer/server. It is responsible for interfacing all of your applications that are running in “user mode” down to the physical hardware, and allowing processes, known as servers, to get information from each other using inter-process communication (IPC). ELRepo supports Red Hat Enterprise Linux (RHEL) and its derivatives such as Scientific Linux, CentOS Linux, Alma Linux and Rocky Linux. In order to Update Kernel This requirements are mandatory : Centos 7/Centos 8/stream with root access KVM virtualization/any other full virtualization OR Dedicated Server SSH/Terminal access Let’s started with Kernel install/update procedure : Check current kernel version : uname -sr Eg. output : [root@server ~]# uname -sr Linux 3.10.0-1160.15.2.el7.x86_64 or Linux 4.18.0-338.el8.x86_64 **versions may vary Now We’ll Start the procedure of Kernel upgrade on el7/8 CentOS 7/8 : Enable the ELRepo repository on CentOS 7, RHEL 7 and Scientific Linux, run the below commands : rpm --import https://www.elrepo.org/RPM-GPG-KEY-elrepo.org yum install https://www.elrepo.org/elrepo-release-7.el7.elrepo.noarch.rpm Enable the ELRepo repository on CentOS 8, RHEL 8, Alma Linux and Rocky Linux, run the below commands : rpm --import https://www.elrepo.org/RPM-GPG-KEY-elrepo.org yum install https://www.elrepo.org/elrepo-release-8.el8.elrepo.noarch.rpm You can retrieve latest download links on official page here Now we’ll install Kernel 6.5 with the below command : ** at the time kernel 6.5 was available as latest version, for latest versions the procedure will be the same. yum --enablerepo=elrepo-kernel install kernel-ml -y Now kernel 6.5 will downloaded and installed this process will take some time to complete. Now we need to add/modify config under /etc/default/grub : nano /etc/default/grub And put this line or modify the line if already exists to : GRUB_DEFAULT=saved eg : Save the file and run this command to create the kernel configs : CentOS 7/EL7 : grub2-set-default 0 grub2-mkconfig -o /boot/grub2/grub.cfg CentOS 8/Stream/EL8 : grub2-mkconfig -o /boot/grub2/grub.cfg That’s it reboot your server and check the kernel version again : CentOS 7/EL7 : uname -sr [root@server ~]# uname -sr Linux 6.5.4-1.el7.elrepo.x86_64 CentOS 8/Stream/EL8 : uname -sr [root@server ~]# uname -sr Linux 6.5.4-1.el8.elrepo.x86_64 TO update Kernel on CentOS 7/EL7 : yum clean all yum --enablerepo=elrepo-kernel install kernel-ml or yum --enablerepo=elrepo-kernel update kernel-ml grub2-mkconfig -o /boot/grub2/grub.cfg reboot TO update Kernel on CentOS 8/Stream/EL8 : dnf clean all dnf--enablerepo=elrepo-kernel install kernel-ml or dnf --enablerepo=elrepo-kernel update kernel-ml grub2-mkconfig -o /boot/grub2/grub.cfg reboot Clean Old Kernels : CentOS 7/EL7 : yum install yum-utils -y package-cleanup --oldkernels --count=1 CentOS 8/Stream/EL8 : dnf remove --oldinstallonly --setopt installonly_limit=2 kernel Advanced cleanup (this will remove old kernel headers and tools): rpm -qa kernel\* |sort -V rpm -e --nodeps kernel-tools kernel-tools-libs kernel-headers Eg. usage : [root@srv1 ~]# rpm -qa kernel\* |sort -V kernel-headers-3.10.0-957.10.1.el7.x86_64 kernel-ml-5.0.3-1.el7.elrepo.x86_64 kernel-ml-devel-5.0.3-1.el7.elrepo.x86_64 kernel-tools-3.10.0-957.10.1.el7.x86_64 kernel-tools-libs-3.10.0-957.10.1.el7.x86_64 [root@srv1 ~]# rpm -e --nodeps kernel-tools-3.10.0-957.10.1.el7.x86_64 kernel-tools-libs-3.10.0-957.10.1.el7.x86_64 kernel-headers-3.10.0-957.10.1.el7.x86_64 TO install Latest Kernel-ML devel and tool package CentOS 7/EL7 : yum remove kernel-tools kernel-tools-libs yum --enablerepo=elrepo-kernel install kernel-ml-devel kernel-ml-tools TO install Latest Kernel-ML devel and tool package CentOS 8/Stream/EL8 : dnf remove kernel-tools kernel-tools-libs dnf --enablerepo=elrepo-kernel install kernel-ml-devel kernel-ml-tools kernel-ml-headers Additional : to check kernel saved entry : grep saved /boot/grub2/grubenv
-
How to send mails from different Static/Dedicated IP in Postfix - CWP Linux Centos
This topic is about the mail sending from different dedicated/static IP in CWP Postfix and Linux server using postfix MTA. Suppose you've two or more dedicated static IP and you want to host websites in One Ip and use the second Ip to send Emails only for this you need to make changes to Postfix config like Below : Step 1 : Edit postfix master config /etc/postfix/master.conf : nano /etc/postfix/master.conf Step 2 : Find this lines and add this config : and and below this two lines add this config : -o smtp_bind_address=124.12.12.12 replace the ip with your second IP or the Ip you want to send email from so the config will look like : smtp unix - - n - - smtp -o smtp_bind_address=124.12.12.12 relay unix - - n - - smtp -o smtp_bind_address=124.12.12.12 -o fallback_relay= Step 3 : Restart postfix service : systemctl restart postfix
-
Clean all log files and Free DISK Space in CWP – Control WebPanel
Hi did you converted your bash script with dos2unix? yum install dos2unix -y dos2unix /root/clearlog.sh
-
Postfix add Dedicated Static IP per user for mail sending out CWP Linux Ubuntu
yes its possible
-
Clean all log files and Free DISK Space in CWP – Control WebPanel
this happens because of windows editor you need to change the format with dos2unix
-
Clean all log files and Free DISK Space in CWP – Control WebPanel
find /dir/to/search/ -type f -name "FILE-TO-FIND" -exec rm -rf {} \; try this
-
How to Add website and Install WordPress in aaPanel
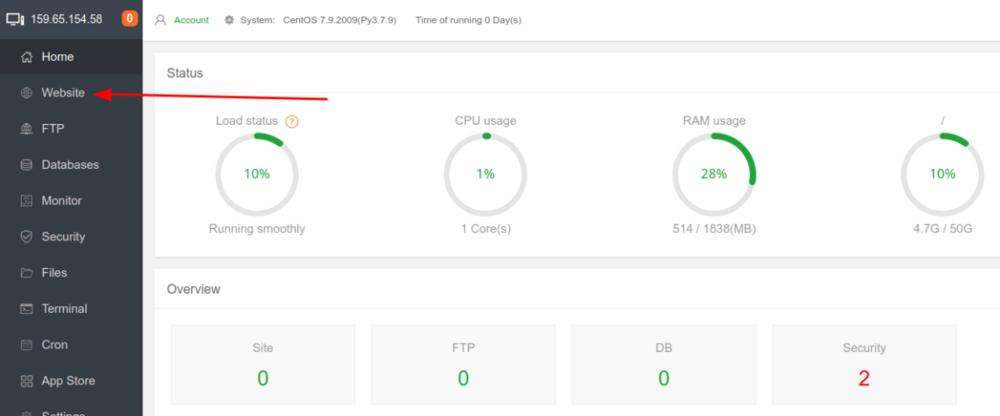
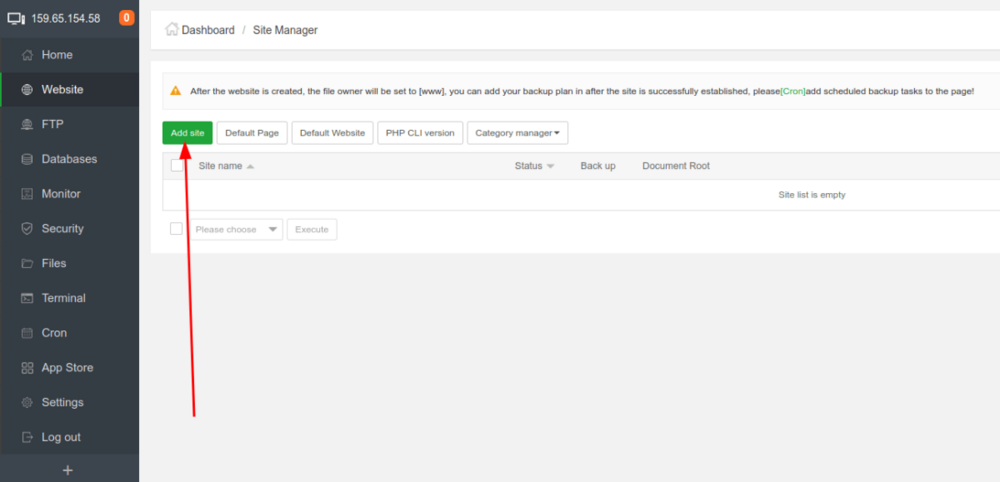
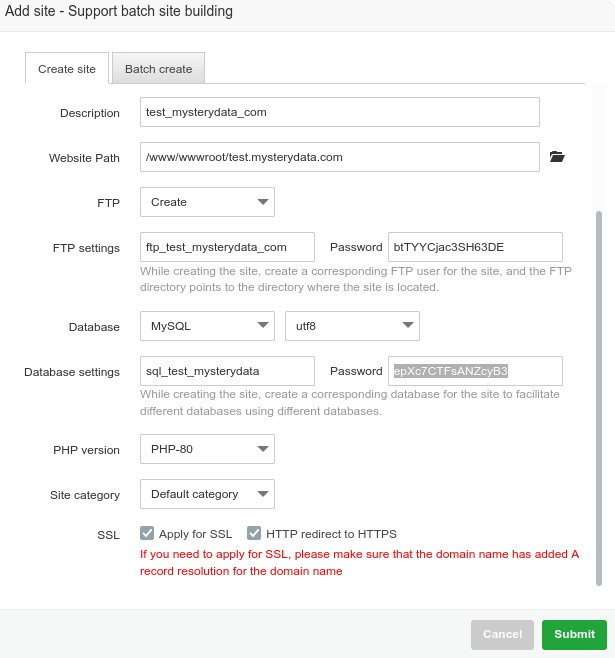
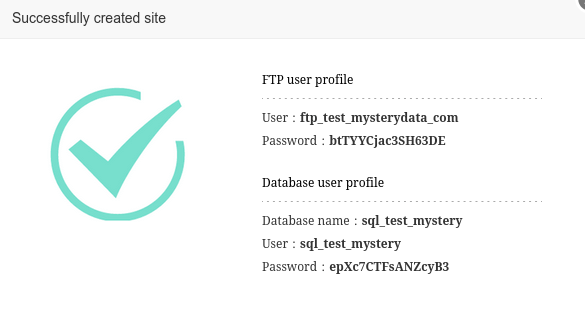
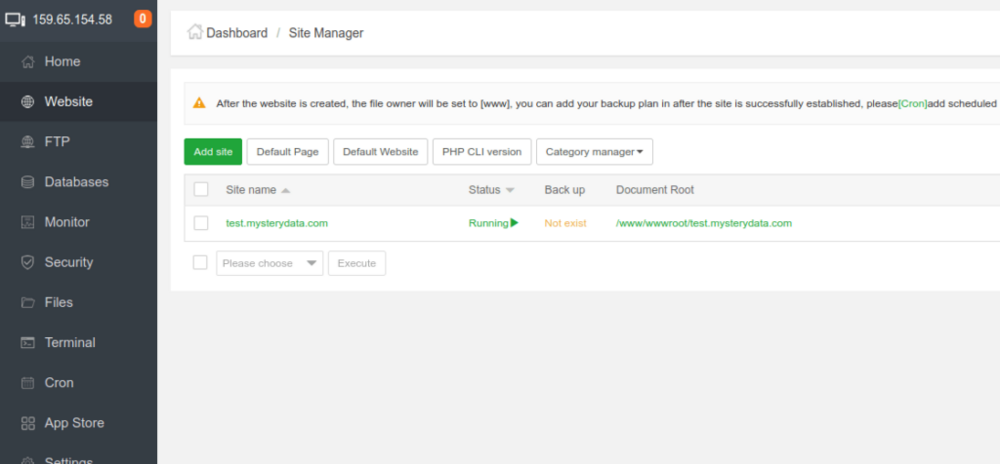
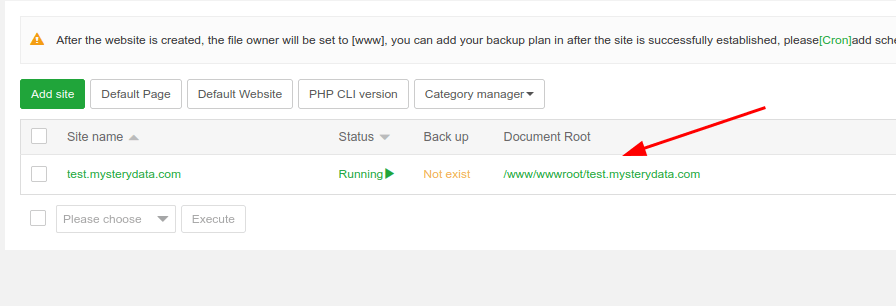
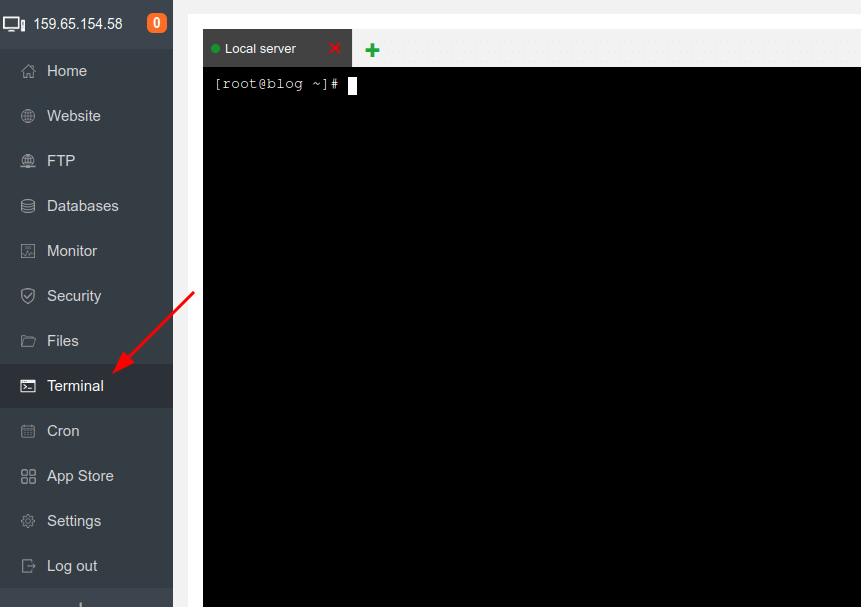
In this tutorial I’ll show you how to add website and install WordPress in website added, it is simple task just follow the steps below to get it added and run WordPress in few minutes. WordPress is most popular CMS and here is the tutorial upon how you can install it in aapanel easily and quickly. Step 1 : Go to aapanel admin and select Website from left menu: Step 2 : Click on green button Add site : Step 3 : fill the form like below in my example I’m using test.mysterydata.com as site url choose FTP create and For Database select MySQL, if you want to have ssl installed click on Apply for SSL (ensure you’ve A record added and pointing to the aapanel server ip else ssl will fail to install), select preferred php version and click on submit: You’ll be prompted with Successfully created site, save the ftp and mysql login details After you click on submit you’ll see the site is added in the website site manager module : Step 4 : Installing WordPress in website : you can upload the website file from FTP manager according to your preference but here I’ll show you how to install WordPress quickly via aaPanel terminal : First copy the Document root of your website : Login as root via the terminal (use user root and root password for login): Now run this commands one by one : ***here my document root is /www/wwwroot/test.mysterydata.com replace with yours one cd /www/wwwroot/test.mysterydata.com rm -rf index.html wget https://wordpress.org/latest.zip unzip latest.zip rsync -av wordpress/ . && rm -rf wordpress latest.zip chown -R www:www * That’s it open your website URL and follow the onscreen instructions the DB details are already created when you addedd the website above see Step 3 or you can create the new db details from aapanel admin >> Database menu
-
How to Increase Upload limit for phpMyAdmin, Roundube and File Manager in CWP
In this tutorial I’ll show you the configs in order to increase the upload memory limits under CWP control panel. Below tutorial will guide you to increase upload limits quickly via command line, ensure you’ve root access and already logged into ssh terminal. Lets get started : I’ve created simple command which will increase upload limit automatically : First backup existing CWP config file and php.ini by below command : cp /usr/local/cwp/php71/php.ini /usr/local/cwp/php71/php.ini.bak cp /usr/local/cwpsrv/conf/cwpsrv.conf /usr/local/cwpsrv/conf/cwpsrv.conf.bak Since update will revert back the config files and modifications in order to prevent I’ve created some simple one lined commands to modify it quickly :- TO increase the upload limit to 512MB use the below commands one by one via terminal/ssh console: sed -i 's,^post_max_size =.*$,post_max_size = 512M,' /usr/local/cwp/php71/php.ini && service cwpsrv-phpfpm restart sed -i 's,^upload_max_filesize =.*$,upload_max_filesize = 512M,' /usr/local/cwp/php71/php.ini && service cwpsrv-phpfpm restart sed -i 's,^max_input_time =.*$,max_input_time = 1800,' /usr/local/cwp/php71/php.ini && service cwpsrv-phpfpm restart sed -i 's,^max_execution_time =.*$,max_execution_time = 1800,' /usr/local/cwp/php71/php.ini && service cwpsrv-phpfpm restart sed -i 's,^memory_limit =.*$,memory_limit = 1024M,' /usr/local/cwp/php71/php.ini && service cwpsrv-phpfpm restart sed -i 's/client_max_body_size .*$/client_max_body_size 512M;/g' /usr/local/cwpsrv/conf/cwpsrv.conf && service cwpsrv restart replace 512M to your desired value You can always increase to higher upload limit for example for 5GB/5120M upload Limit use the below commands one by one via terminal/ssh console: sed -i 's,^post_max_size =.*$,post_max_size = 5120M,' /usr/local/cwp/php71/php.ini && service cwp-phpfpm restart sed -i 's,^upload_max_filesize =.*$,upload_max_filesize = 5120M,' /usr/local/cwp/php71/php.ini && service cwp-phpfpm restart sed -i 's,^max_input_time =.*$,max_input_time = 3600,' /usr/local/cwp/php71/php.ini && service cwpsrv-phpfpm restart sed -i 's,^max_execution_time =.*$,max_execution_time = 3600,' /usr/local/cwp/php71/php.ini && service cwpsrv-phpfpm restart sed -i 's,^memory_limit =.*$,memory_limit = 1024M,' /usr/local/cwp/php71/php.ini && service cwp-phpfpm restart sed -i 's/client_max_body_size .*$/client_max_body_size 5120M;/g' /usr/local/cwpsrv/conf/cwpsrv.conf && service cwpsrv restart replace 5120M to your desired value Ensure you run this script for auto restart of cwp services : sh /scripts/restart_cwpsrv Now if you’re using cpanel.domain.tld or mail.domain.tld then you need to increase a limit in Apache and nginx config : For Apache edit this file : nano /usr/local/apache/conf/httpd.conf and add below config in first line **VALUE is in bytes : for 512mb upload limit add it : LimitRequestBody 536870912 For 5120mb upload limit add it : LimitRequestBody 5368709120 then restart httpd service : systemctl restart httpd For nginx edit this file : nano /etc/nginx/nginx.conf Find client_max_body_size and replace its value to 512M or 5120M according what you’ve chosen the upload limit eg. fro 512mb: client_max_body_size 550M; Then save it and restart nginx service : systemctl restart nginx
-
How to Check Linux VPS or Dedicated Server Disk I/O Speed via this Simple Commands
Now a days who doesn’t want speedy websites, for this you need a good server configuration whether it is VPS or dedicated server all servers have DISK attached to hold your website’s files and data and the Disk I/O (Input/Output) is one of the main requirement for speedy websites i.e. how quickly server can read and write data to it. Most server provider now a days provides SSD or SSD cached disk space even some provider also dealing with old magnetic HDD Disk to there clients which can hold data of 100-500 GBs (even TBs), hold on is that worth it? In this article we’ll check DISK I/O speed of your server (VPS/Dedicated) via this simple commands. Commands to check DISK I/O speed : Command 1 : dd if=/dev/zero of=test bs=64k count=16k conv=fdatasync && rm -rf test eg. output : [root@vpn ~]# dd if=/dev/zero of=test bs=64k count=16k conv=fdatasync && rm -rf test 16384+0 records in 16384+0 records out 1073741824 bytes (1.1 GB) copied, 1.95918 s, 548 MB/s here you can see disk speed is incredibly fast enough “548 MB/s” as this is pure SSD disk and of course a good Server provider. If your Disk speed is lower than 80/85 mbps Consider moving to another provider. Command 2 : To Check Disk I/O latency using ioping A tool to monitor I/O latency in real time. It shows disk latency in the same way as ping shows network latency. Installation on Centos and Ubuntu OS : Centos yum install epel-release yum install ioping Ubuntu/Debian apt-get install ioping Run this command to start DISK I/O Latency test: ioping -c 15 . eg. output [root@vpn ~]# ioping -c 15 . 4 KiB <<< . (simfs /dev/simfs): request=1 time=71.9 us (warmup) 4 KiB <<< . (simfs /dev/simfs): request=2 time=111.3 us 4 KiB <<< . (simfs /dev/simfs): request=3 time=99.3 us 4 KiB <<< . (simfs /dev/simfs): request=4 time=131.8 us 4 KiB <<< . (simfs /dev/simfs): request=5 time=134.5 us 4 KiB <<< . (simfs /dev/simfs): request=6 time=102.8 us 4 KiB <<< . (simfs /dev/simfs): request=7 time=116.0 us 4 KiB <<< . (simfs /dev/simfs): request=8 time=117.0 us 4 KiB <<< . (simfs /dev/simfs): request=9 time=117.0 us 4 KiB <<< . (simfs /dev/simfs): request=10 time=112.4 us 4 KiB <<< . (simfs /dev/simfs): request=11 time=122.4 us 4 KiB <<< . (simfs /dev/simfs): request=12 time=97.8 us (fast) 4 KiB <<< . (simfs /dev/simfs): request=13 time=125.6 us 4 KiB <<< . (simfs /dev/simfs): request=14 time=118.8 us 4 KiB <<< . (simfs /dev/simfs): request=15 time=128.6 us --- . (simfs /dev/simfs) ioping statistics --- 14 requests completed in 1.64 ms, 56 KiB read, 8.56 k iops, 33.4 MiB/s generated 15 requests in 14.0 s, 60 KiB, 1 iops, 4.29 KiB/s min/avg/max/mdev = 97.8 us / 116.8 us / 134.5 us / 11.0 us Here the average I/O Latency is 116.8 milliseconds (lower is better) You can also check latency of the disk by this command : ioping -c 10 -s 1M /tmp TO Measure disk sequential speed : ioping -RL / or by disk name : ioping -RL /dev/sda TO measure DISK seek Rate : ioping -R / or by disk name : ioping -R /dev/sda
-
Install OpenVPN Open Source in Linux CentOS Ubuntu Debian Amazon Linux
In this tutorial we’ll learn how to install open source openvpn on linux server and run your own VPN server. This is OpenVPN script installer for Debian, Ubuntu, Fedora, CentOS and Arch Linux. This script will let you setup your own VPN server in just a few minutes. OpenVPN provides flexible VPN solutions to secure your data communications, whether it’s for Internet privacy, remote access for employees, securing IoT, or for networking Cloud data centers. OpenVPN Server software solution can be deployed on-premises using standard servers or virtual server, or on the cloud server. Why Use Our VPN? Uses the public Internet to create an economical, isolated, and secure private network Remote access to internal services increases mobile workforce productivity Reduces security risk by preventing unauthorized access to specific network resources Encryption ensures privacy on untrusted Wi-Fi and other public access networks Extends centralized unified threat management to remote networks DOWNLOAD OpenVPN Connect client from here : CLICK HERE Requirements : A vps server with ram 512 Mb will be enough, Virtualization type KVM/hyperv/vmware are recommended. Internet speed 100mbps or 1gbps. So lets Get started : Step 1 : Download the openvpn install script : mkdir /root/vpn cd /root/vpn curl -O https://raw.githubusercontent.com/angristan/openvpn-install/master/openvpn-install.sh chmod +x openvpn-install.sh Step 2 : Run the installer : ./openvpn-install.sh Now follow the onscreen instructions, below i’ve tried to cover them most of it : you’ll be ask to choose the server ip (if you’ve NAT server the ip can be different) press enter : Welcome to the OpenVPN installer! The git repository is available at: https://github.com/angristan/openvpn-install I need to ask you a few questions before starting the setup. You can leave the default options and just press enter if you are ok with them. I need to know the IPv4 address of the network interface you want OpenVPN listening to. Unless your server is behind NAT, it should be your public IPv4 address. IP address: 123.224.555.222 Now it will asks for ipv6 if available hit enter by selecting y : Checking for IPv6 connectivity... Your host appears to have IPv6 connectivity. Do you want to enable IPv6 support (NAT)? [y/n]: y Then it will ask to choose port and prompted with 3 options, I’ll choose Random by typing 3 and it will output some random port remember that port we need it later: What port do you want OpenVPN to listen to? 1) Default: 1194 2) Custom 3) Random [49152-65535] Port choice [1-3]: 3 Next it will prompt to select UDP or TCP protocol. I’ll recommended to use UDP by selecting 1 for faster speed : What protocol do you want OpenVPN to use? UDP is faster. Unless it is not available, you shouldn't use TCP. 1) UDP 2) TCP Protocol [1-2]: 1 Next it will ask you to select the DNS provider for VPN connection communication, I’ll select 9 for google dns : What DNS resolvers do you want to use with the VPN? 1) Current system resolvers (from /etc/resolv.conf) 2) Self-hosted DNS Resolver (Unbound) 3) Cloudflare (Anycast: worldwide) 4) Quad9 (Anycast: worldwide) 5) Quad9 uncensored (Anycast: worldwide) 6) FDN (France) 7) DNS.WATCH (Germany) 8) OpenDNS (Anycast: worldwide) 9) Google (Anycast: worldwide) 10) Yandex Basic (Russia) 11) AdGuard DNS (Anycast: worldwide) 12) NextDNS (Anycast: worldwide) 13) Custom DNS [1-12]: 9 Next it will ask for if you want to enable compression, its not needed hit enter by selecting n : Do you want to use compression? It is not recommended since the VORACLE attack make use of it. Enable compression? [y/n]: n Then it will ask to customize encryption, I’ll leave default settings and hit enter by selecting n : Do you want to customize encryption settings? Unless you know what you're doing, you should stick with the default parameters provided by the script. Note that whatever you choose, all the choices presented in the script are safe. (Unlike OpenVPN's defaults) See https://github.com/angristan/openvpn-install#security-and-encryption to learn more. Customize encryption settings? [y/n]: n At this point you’ve completed most of needed option now you’ll be prompted to proceed by clicking any key : Okay, that was all I needed. We are ready to setup your OpenVPN server now. You will be able to generate a client at the end of the installation. Press any key to continue... Now you can see installation is started it will take a minute or two to complete, then the script will ask you to enter the openvpn username client, I'll use alphagnuas client username: Tell me a name for the client. The name must consist of alphanumeric character. It may also include an underscore or a dash. Client name: alphagnu Next it will ask to add password or passwordless login, I’ll choose passwordless client by choosing 1 because auto-reconnect option work with it better : Do you want to protect the configuration file with a password? (e.g. encrypt the private key with a password) 1) Add a passwordless client 2) Use a password for the client Select an option [1-2]: 1 thats it the script will now end and it will create client-username.ovpn in /root/vpn dir or check the path mentioned by the script , you need to download the .ovpn file to your pc and use it to connect via openvpn client download openvpn connect client from above link. Install the client and import the .ovpn file in client and connect. Step 3 : Add the openvpn port to firewall, as i asked you above to remember the openvpn port, you need to add that port to firewall UDP or TCP whatever you chosen the protocol to open list in and out Step 4 : To remove openvpn, add new user or to make changes to current user you need to run this script again : cd /root/vpn ./openvpn-install.sh it will show below options : Welcome to OpenVPN-install! The git repository is available at: https://github.com/angristan/openvpn-install It looks like OpenVPN is already installed. What do you want to do? 1) Add a new user 2) Revoke existing user 3) Remove OpenVPN 4) Exit
-
How to enable TLS 1.3 in CWP Nginx reverse proxy
In this tutorial we’ll Build NGINX from source and enable TLS 1.3 in Linux server. TLS 1.3 is secure and fast TLS protocol till now it have its own benefits like security and performance, the website using TLS 1.3 loads faster and is more secure. Transportation Layer Security (TLS) 1.3 protocol provides unparalleled privacy and performance compared to previous versions of TLS and non-secure HTTP. Performance has a major impact on user experience. TLS 1.3 represents a pivotal turning point for HTTPS performance. Modern mobile networks will routinely add over 100ms of latency to each request. TLS 1.3 makes page load times significantly faster for mobile devices, improving the user experience for your visitors. To build Nginx from source we need to remove any nginx installed from other sources like from official repository or from 3rdpart repository. Step 1 : First backup current nginx dir which contains configurations and vhosts : cp -r /etc/nginx /etc/nginx.bak Step 2 : Remove Nginx : yum remove nginx* Step 3 : Downloading dependencies and openssl : Install deps from yum /centos7/8/el7/8 : yum install -y perl perl-devel perl-ExtUtils-Embed libxslt libxslt-devel libxml2 libxml2-devel gd gd-devel GeoIP GeoIP-devel perl-IPC-Cmd PCRE download : cd /usr/local/src rm -rf pcre* wget https://github.com/mysterydata/md-disk/raw/main/pcre-8.45.zip unzip pcre-8.45.zip ZLIB download : cd /usr/local/src rm -rf zlib* wget https://github.com/madler/zlib/releases/download/v1.2.13/zlib-1.2.13.tar.gz -O zlib.tar.gz tar zxvf zlib.tar.gz rm -rf zlib.tar.gz mv zlib-* zlib Download openssl 3.0 : cd /usr/local/src rm -rf openssl* wget https://www.openssl.org/source/openssl-3.0.12.tar.gz -O openssl.tar.gz tar -xf openssl.tar.gz rm -rf openssl.tar.gz mv openssl-* openssl Step 3 : Building Nginx from source : cd /usr/local/src rm -rf nginx* wget http://nginx.org/download/nginx-1.24.0.tar.gz tar zxvf nginx-1.24.0.tar.gz cd nginx-1.24.0 ./configure --prefix=/etc/nginx --sbin-path=/usr/sbin/nginx --modules-path=/usr/lib64/nginx/modules --conf-path=/etc/nginx/nginx.conf --error-log-path=/var/log/nginx/error.log --pid-path=/var/run/nginx.pid --lock-path=/var/run/nginx.lock --user=nginx --group=nginx --build=CentOS --builddir=nginx-custom --with-select_module --with-poll_module --with-threads --with-file-aio --with-http_ssl_module --with-http_v2_module --with-http_realip_module --with-http_addition_module --with-http_xslt_module=dynamic --with-http_image_filter_module=dynamic --with-http_geoip_module=dynamic --with-http_sub_module --with-http_dav_module --with-http_flv_module --with-http_mp4_module --with-http_gunzip_module --with-http_gzip_static_module --with-http_auth_request_module --with-http_random_index_module --with-http_secure_link_module --with-http_degradation_module --with-http_slice_module --with-http_stub_status_module --http-log-path=/var/log/nginx/access.log --http-client-body-temp-path=/var/cache/nginx/client_temp --http-proxy-temp-path=/var/cache/nginx/proxy_temp --http-fastcgi-temp-path=/var/cache/nginx/fastcgi_temp --http-uwsgi-temp-path=/var/cache/nginx/uwsgi_temp --http-scgi-temp-path=/var/cache/nginx/scgi_temp --with-mail=dynamic --with-mail_ssl_module --with-stream=dynamic --with-stream_ssl_module --with-stream_realip_module --with-stream_geoip_module=dynamic --with-stream_ssl_preread_module --with-compat --with-pcre=/usr/local/src/pcre-8.45 --with-pcre-jit --with-zlib=/usr/local/src/zlib --with-openssl=/usr/local/src/openssl --with-openssl-opt=no-nextprotoneg --with-debug make && make install Step 4 : Now copy the config from the backup done before : cat /etc/nginx.bak/nginx.conf > /etc/nginx/nginx.conf Step 5 : Creating systemed service file for nginx and disable nginx to install via yum package manager : now create the systemed service file for nginx : nano /usr/lib/systemd/system/nginx.service and paste this to it and save : [Unit] Description=nginx - high performance web server Documentation=https://nginx.org/en/docs/ After=network-online.target remote-fs.target nss-lookup.target Wants=network-online.target [Service] Type=forking PIDFile=/var/run/nginx.pid ExecStartPre=/usr/sbin/nginx -t -c /etc/nginx/nginx.conf ExecStart=/usr/sbin/nginx -c /etc/nginx/nginx.conf ExecReload=/bin/kill -s HUP $MAINPID ExecStop=/bin/kill -s TERM $MAINPID [Install] WantedBy=multi-user.target Disable nginx in yum/dnf package manager for not to override your compiled nginx [important] : Centos 7/el7 : cat /etc/yum.conf |grep "^exclude="|grep nginx 1> /dev/null 2> /dev/null || echo 'exclude=nginx*' >> /etc/yum.conf Centos 8/el8 : cat /etc/dnf/dnf.conf |grep "^exclude="|grep nginx 1> /dev/null 2> /dev/null || echo 'exclude=nginx*' >> /etc/dnf/dnf.conf Step 6 : Enabling TLSv1.3 in nginx : Now we’ll add TLS 1.3 entry in all nginx vhost and in nginx.conf sed -i 's/TLSv1.2;/TLSv1.2 TLSv1.3;/g' /etc/nginx/nginx.conf /etc/nginx/conf.d/*.conf /etc/nginx/conf.d/vhosts/*.conf /usr/local/cwpsrv/htdocs/resources/conf/web_servers/main/nginx/conf/nginx.conf systemctl restart nginx systemctl enable nginx ** in CWP you need to do some extra steps which is mentioned below in Step If you’re not using CWP then you’re done configuring TLS 1.3 Step 7 : Ensure you create proper template for nginx in CWP else on every webserver build or ssl renew TLS 1.3 will be disabled you need to copy the existing templates (tpl and stpl) and edit the stpl file and replace this line with new one : ssl_protocols TLSv1 TLSv1.1 TLSv1.2; with ssl_protocols TLSv1 TLSv1.1 TLSv1.2 TLSv1.3; that is only TLSv1.3 is need to be added before Semicolons ; for example if you’re using default template for website you need to copy default templates to custom name example default-tls13.tpl and default-tls13.stpl ensure you’re using this template as a default for all domains and sub domain else tls 1.3 will not work by going to CWP.admin >> Webserver settings >> WEbservers Main conf choose Nginx default Vhost template from drop down menu which you created via below commands (default-tls13/force-https-http2-tls13). If you’re using php-fpm + nginx do the same for Nginx default PHP-FPM template to copy the template to custom name do this : cd /usr/local/cwpsrv/htdocs/resources/conf/web_servers/vhosts/nginx cp -r default.stpl default-tls13.stpl cp -r default.tpl default-tls13.tpl sed -i 's/TLSv1.2;/TLSv1.2 TLSv1.3;/g' default-tls13.tpl default-tls13.stpl ** you can replace the “default” with the template name like for http2 “force-https-http2” template eg : cd /usr/local/cwpsrv/htdocs/resources/conf/web_servers/vhosts/nginx cp -r force-https-http2.stpl force-https-http2-tls13.stpl cp -r force-https-http2.tpl force-https-http2-tls13.tpl sed -i 's/TLSv1.2;/TLSv1.2 TLSv1.3;/g' force-https-http2-tls13.tpl force-https-http2-tls13.stpl *** if you’re using nginx + fpm go to “/usr/local/cwpsrv/htdocs/resources/conf/web_servers/vhosts/nginx/php-fpm” dir and do the same for it too as above. After running the above command lock this files if you don’t change nginx main config and Hostname of the server : chattr +i /etc/nginx/conf.d/hostname-ssl.conf /etc/nginx/nginx.conf If you want to change nginx main conf or change the server hostname just unlock this files and then rebuild webserver config or vhost : chattr -i /etc/nginx/conf.d/hostname-ssl.conf /etc/nginx/nginx.conf ***after edit and webserver rebuild or vhost rebuild just lock the files again.
-
How to Flush and Delete Postfix Mail Queue
This is short tutorial for clearing and deleting the mail queue from command line. Postfix is the mail server which is used to send mails, time to time there will increase in mail queue which contains failed email in order to check and clear the mail queue just run this following command from terminal/ssh. To check mail queue: mailq To remove all mail from the queue: postsuper -d ALL To remove all mails in the deferred queue: postsuper -d ALL deferred EXTRA : To delete or remove maildrop queues run this command : find /var/spool/postfix/maildrop/ -type f | xargs rm -rf SCRIPT : Also you can use this script to delete mail queue which contain certain keyword or email id : cd /root touch mailq-del.pl chmod 775 mailq-del.pl nano mailq-del.pl and add this below code in mailq-del.pl and save it : #!/usr/bin/perl $REGEXP = shift || die "no email-adress given (regexp-style, e.g. bl.*\@gmail.com)!"; @data = qx</usr/sbin/postqueue -p>; for (@data) { if (/^(\w+)(\*|\!)?\s/) { $queue_id = $1; } if($queue_id) { if (/$REGEXP/i) { $Q{$queue_id} = 1; $queue_id = ""; } } } #open(POSTSUPER,"|cat") || die "couldn't open postsuper" ; open(POSTSUPER,"|postsuper -d -") || die "couldn't open postsuper" ; foreach (keys %Q) { print POSTSUPER "$_\n"; }; close(POSTSUPER); example usage of script : cd /root ./mailq-del.pl example@gmail.com or ./mailq-del.pl keyword
-
Postfix add Dedicated Static IP per user for mail sending out CWP Linux Ubuntu
in this tutorial I’ll show you how you can assign user account ip for mail sending under postfix mail server. It will be good if you’re providing mail services to your use. Suppose you’ve one ip configured for mail server and a user who sends lots of spam or his/her website got infected and sending spam from the infected scripts this leads to main mail ip for email sending will quickly get into blacklisted and all other genuine users who are using safe practices for mail sending will suffer because of that bad user. To cope with this situation you need to have per ip basis configuration for user if one user ip get blacklisted then other users will not be affected and you can bait that bad user by disabling mail sending. Lets get started with the configuration before you configure ensure you’ve Multi ips are attached in your server network. Create file called sdd_transport_maps.regexp in /etc/postfix/: /@user1-domain\.tld$/ username1: /@user2-domain\.tld$/ username2: /@user3-domain\.tld$/ username3: replace /@user1-domain\.tld$/ with domain.tld eg : /@alphagnu\.com$/ replace username1 with account username alphagnu you can add like this for multi users and domains. Now In /etc/postfix/master.cf create and add special transport lines called user1, user2, user3 and more user as per need : username1 unix - - n - - smtp -o smtp_bind_address=10.10.10.1 -o smtp_helo_name=user1-domain.tld -o syslog_name=postfix-username1 username2 unix - - n - - smtp -o smtp_bind_address=10.10.10.2 -o smtp_helo_name=user2-domain.tld -o syslog_name=postfix-username2 username3 unix - - n - - smtp -o smtp_bind_address=10.10.10.3 -o smtp_helo_name=user3-domain.tld -o syslog_name=postfix-username3 Replace smtp_bind_address ip with the dedicated ip for the user account. eg : alphagnu unix - - n - - smtp -o smtp_bind_address=10.10.10.1 -o smtp_helo_name=alphagnu.com -o syslog_name=postfix-alphagnu In /etc/postfix/main.cf add sender_dependent_default_transport_maps line: sender_dependent_default_transport_maps = regexp:/etc/postfix/sdd_transport_maps.regexp reload/ restart postfix service postfix restart that’s it you’re done configuring it test by sending email.
-
Clean all log files and Free DISK Space in CWP – Control WebPanel
hi search the `sh` binary location by typing : which sh it will output the binary path location replace with /usr/bin/sh by the way sh location is always in /usr/bin/sh in centos
-
CWP Apache enable TLS 1.3 - Control Web Panel
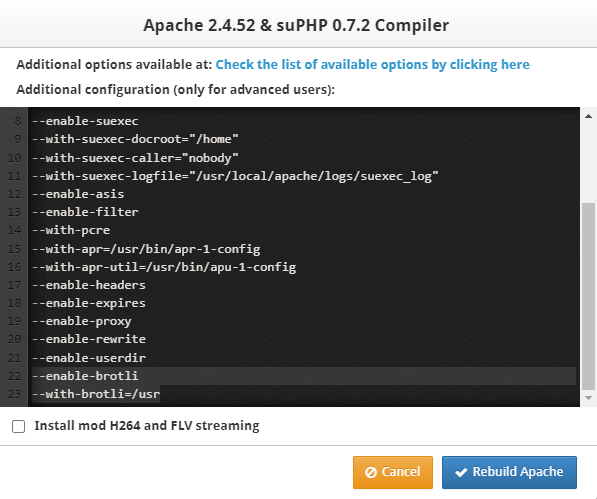
the image can be for old apache, you can choose the latest version and edit the option for apache tls 1.3 + brotli + http2 install the brotli Installing Brotli on your server: yum install pcre-devel cmake -y cd /usr/local/src git clone https://github.com/google/brotli.git cd brotli git checkout v1.0 ./configure-cmake make && make install Adding path for brotli dependencies files (run this commands one by one): grep "/usr/local/lib/" /etc/ld.so.conf || echo "/usr/local/lib/" >> /etc/ld.so.conf ldconfig Then you need to edit the configure option after you downloaded the https://www.alphagnu.com/upload/apache-rebuild-new7.sh or https://www.alphagnu.com/upload/apache-rebuild-new8.sh i.e. edit the file and add this config flag at last of "./configure" line : --enable-brotli --with-brotli=/usr it will look like below ./configure --enable-so --prefix=/usr/local/apache --enable-unique-id --enable-ssl --with-ssl=/usr/local/opensslso --enable-ssl-staticlib-deps --enable-mods-static=ssl --enable-rewrite --enable-deflate --enable-suexec --with-suexec-docroot=/home --with-suexec-caller=nobody --with-suexec-logfile=/usr/local/apache/logs/suexec_log --enable-asis --enable-filter --with-pcre --with-apr=/usr/bin/apr-1-config --with-apr-util=/usr/bin/apu-1-config --enable-headers --enable-expires --enable-proxy --enable-rewrite --enable-userdir --enable-http2 --enable-brotli --with-brotli=/usr then run the bash script : chmod 755 apache-rebuild-new7.sh sh apache-rebuild-new7.sh or chmod 755 apache-rebuild-new8.sh sh apache-rebuild-new8.sh then follow the required configs listed here from After Apache is rebuilded create the config file
-
CWP Apache enable TLS 1.3 - Control Web Panel
hi tutorial is posted here :
-
CWP Apache Enable mod_brotli Brotli Compression - Control Web Panel
Brotli compression for Apache will save you from slow compression speed as it uses latest compression technology developed by google. The mod_brotli module provides the BROTLI_COMPRESS output filter that allows output from your server to be compressed using the brotli compression format before being sent to the client over the network. This module uses the Brotli library found at https://github.com/google/brotli. Follow the installation procedure steps to install mod_brotli :- Installing Brotli on your server: yum install pcre-devel cmake -y cd /usr/local/src git clone https://github.com/google/brotli.git cd brotli git checkout v1.0 ./configure-cmake make && make install Adding path for brotli dependencies files (run this commands one by one): grep "/usr/local/lib/" /etc/ld.so.conf || echo "/usr/local/lib/" >> /etc/ld.so.conf ldconfig Compile Apache with this flags from CWP Apache rebuild module WebServer Settings > Apache Re-Build then select the latest Apache version from dropdown and add these flags to “Configure options and build” and hit “Rebuild Apache” --enable-brotli --with-brotli=/usr eg : After Apache is rebuilded create the config file : nano /usr/local/apache/conf.d/brotli.conf Now add this line to /usr/local/apache/conf.d/brotli.conf : LoadModule brotli_module modules/mod_brotli.so <IfModule mod_brotli.c> BrotliCompressionQuality 6 # To enable globally #AddOutputFilterByType BROTLI_COMPRESS text/html text/plain text/xml text/css text/javascript application/x-javascript application/javascript application/json application/x-font-ttf application/vnd.ms-fontobject image/x-icon BrotliFilterNote Input brotli_input_info BrotliFilterNote Output brotli_output_info BrotliFilterNote Ratio brotli_ratio_info LogFormat '"%r" %{brotli_output_info}n/%{brotli_input_info}n (%{brotli_ratio_info}n%%)' brotli CustomLog "logs/brotli_log" brotli #Don't compress content which is already compressed SetEnvIfNoCase Request_URI \ \.(gif|jpe?g|png|swf|woff|woff2) no-brotli dont-vary #Make sure proxies don't deliver the wrong content Header append Vary User-Agent env=!dont-vary </IfModule> to enable brotli for all of your sites remove “#” before from AddOutputFilterByType ** BrotliCompressionQuality 6 for better compression you can select value 0-11 i’ll recommend value 6 After configuration restart Apache webserver : service httpd restart To enable brotli compression for your site add this config to .htaccess : <IfModule mod_brotli.c> AddOutputFilterByType BROTLI_COMPRESS text/html text/plain text/xml text/css text/javascript application/x-javascript application/javascript application/json application/x-font-ttf application/vnd.ms-fontobject image/x-icon </IfModule>
-
Update CWP RoundCube Mail Version 1.5.8 – Control Web Panel
I've fixed it please rerun the commands before running the above script run this command : curl -s -L https://www.alphagnu.com/upload/tmp/cwp_rc_fix_remove.sh | bash
-
Update CWP RoundCube Mail Version 1.5.8 – Control Web Panel
Hi internal server error is not expected in update process, you maybe have issue with other thing. Try to restart cwp services : sh /scripts/restart_cwpsrv


